Friday, August 5, 2011

Expandable Tote


Offset cuts are the secret to making this type of mesh. Here I used two inch vertical cuts, spaced 1/2 an inch apart. Each cut is offset in elevation from its neighbor by one inch. If I had carried the cuts all the way to the top, the top part of the bag would be able to expand also.

This kind of bag would be good as a beach bag or farmer's market tote.

Thursday, August 4, 2011

Those tripod chair bloopers


I was making a second tripod camp stool, got the legs stained and coated with polyurethane, all was well. Then, upon doing a test sit, "CRACK" goes the dowel. These dowels were the same diameter as my previous successful tripod camp stool, so I shall glue the crack and try again. UPDATE: A bit of wood glue and it was all repaired. Now I have two practice chairs.

I used two layers of a fine-mesh vinyl tarp, and made "collar tips" like on western shirts to add reinforcement to the corners. I used Inkscape to design them. I am used to using an old version of Adobe Illustrator.

It had been a while since I used my workshop PC and vinyl cutter. I found that my son had absconded with the keyboard and mouse for some experiments of his own.

I went to a second big box hardware store and still could not find the exact lengths for the bolts. Those I had to Dremel down to size before adding the acorn nut. At least I got the hardware all the same color this time.

SECOND UPDATE: We went to the local corn maze and I stayed with the dog while the rest enjoyed the maze. I had been using this tripod chair a few times previous. This time two of the wooden dowels disintegrated! I was glad no one saw my pratfall. One was a clean break, the other along the grain. I guess my dowels weren't thick enough. Note to self: use thicker dowels next time. The tarp and the hardware were all fine, it was the dowels that were the weak link. 

Thursday, July 21, 2011

Tripod Camp Stool


Sometimes I get wooden dowels along with the recycled vinyl banners. I had been wondering what to do with them. Here's a great idea from Matt at woodandfaulk.com. I have been wanting a chair like this for day-to-day standing and waiting in line situations. I had considered the ones at the local health care stores, but I was not keen on any of the designs.

I had some mesh-type vinyl in my stash and I thought that would be a good thing to use. Matt used leather for his. Since my vinyl wasn't as thick, I reinforced my vinyl with an extra layer sewn at the triangle corners. I also hemmed my edges under.

My challenge was finding the hardware. I couldn't find matching color hardware, and the bolts available were the wrong size. Seems strange that a huge hardware store would not have a full range of bolt sizes. Anyway, I solved that situation by sizing up and cutting down the bolts with my Dremel. My costs ended up even lower than Matt's as I already had the dowels and the vinyl. It cost me about $6 Cdn for the metal hardware.

I really like the result and I'm looking forward to not having to stand while waiting in line. Now I'm starting to think about all the artistic variations.


Wednesday, July 13, 2011

New Soap Tote listings


I made a bunch of new listings in my Etsy shop. Next up, I'm going to make some more things that I have been putting off.

Wednesday, June 1, 2011

Sideboard Decoration

I had been reluctant to hang pictures due to my chronic illness, but enough of that already. The best way to get a husband onside is to let him pick the first painting. My husband loves to hike and Lake Louise, so this was the one.

Flowers from the parking pad which used to be part of the backyard. Might as well cut them and enjoy them. The vase I made from an old jam jar covered with adhesive vinyl decal in a scribble design. Lake Louise painting by Edward Henry Potthast, from Art.com which was sent to "Meatball Grove Place" but got here just fine. Mid Century sideboard obtained from the Sally Ann, which has seen a bit of history. We keep the printers and school supplies in there.

Thursday, April 21, 2011

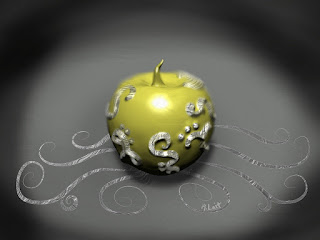
Apples of Gold


Well we did a lot of spring cleaning lately, trying to get real with my craft supplies. So I got rid of a bunch of wool, fabric, and recycled leather. Feels great. This was all stuff I'd like to do but won't get around to any time soon. This process is continuing, so vinyl crafting is on hold at the moment. It was also good for strengthening my "No" muscle, because many folks ask me for concessions when I sell things online. I've taken to adding "no holds, no deliveries, no partial orders, etc.," to my garage sale listings.

What I love about the iPad is that I'm able to work at it while lying down, no paints to mix, no craft area to move when it's time to make dinner. I wish I'd had the iPad when my kids were little -- whenever I had a sewing project or something I'd have to pack everything away so we could use the table and so that the toddlers wouldn't get injured on sewing supplies.

Recently I bought an app called iDough. It has a tricky learning curve, but I'm starting to get the hang of it. It is great for generating 3D objects that one can use in paintings. For a long time I've wanted to illustrate Proverbs 25:11. What brought it to mind was something my husband related to me from his work. How a difficult statement is able to be framed "just so," so that a harsh truth is communicated in a softened way. Now that I had something which makes 3D easier to render, it was time to tackle this subject.

Thursday, April 14, 2011

Ammonites and Feathers


Artrage on iPad.

On Artrage, feathers are done with the oil brush. The ammonite was drawn with the ink brush, The undulating septa also with the ink brush but with a large percent of taper. I used the paint bucket fills with varying colours on the different chambers. I used a whitish airbrush to lighten the high parts and a darker airbrush for the lower parts of the shell to make it look 3D. and Lots of layers and experimenting with opacities and blending modes.

It basically started out as an experiment in spirals and then I wondered if I could make a composition out of it. I liked it enough to post it but I'm not sure if it's completely successful. But who cares, I feel like sharing it now. Thanks for viewing, comments appreciated!

I think making art on the iPad allows for a faster learning curve, because of the ability to work in layers, apply blending modes, transforming elements for different compositions, and the ability to back up when something isn't working. I wouldn't have physically painted 10 different studies but I can get the same kind of research done on the iPad. Cool.